
File Setup Instructions for Illustrator
Step 1 – Product Dimensions
- Illustrator templates are available here.
- Or if you want to start a new document, go to File -> New -> Document Setup and enter correct product dimensions, CMYK Color Mode and 300 Raster Effects on new documents.
- When you start a new document, be sure the final size of the document size includes bleed dimensions.(Illustrator rounds up -> ex. 6.13″ x 4.38″)
- Use inches for the Height and Width measurements.
- Note that 1/16″ (.0625 of an inch) will be trimmed off each side of your product (example: a Standard Postcard 4.375″ x 6.125″ will trim to 4.25″ x 6″).


Step 2 – Bleed edge, Trim edge & Safe Zone
- Our Illustrator templates include guidelines for bleed, trim and safe zone. Download here.
- Borders should be .25″ thick from the bleed edge (3/16″ or .1875″ from trim). 3/16″ is minimum border recommended.
- 1/16″ (.0625 of an inch) will be trimmed off each side of your product (example: a Standard Postcard 4.375″ x 6.125″ will trim to 4.25″ x 6″).
Caution:
- Elements too close to or over the trim edge may trim into or leave a visible leak.
- Borders thinner than 3/16″ from bleed edge may appear uneven when trimmed.
- Images bordering the trim edge may cause a leak on final cards. Images should “bleed” off the page.

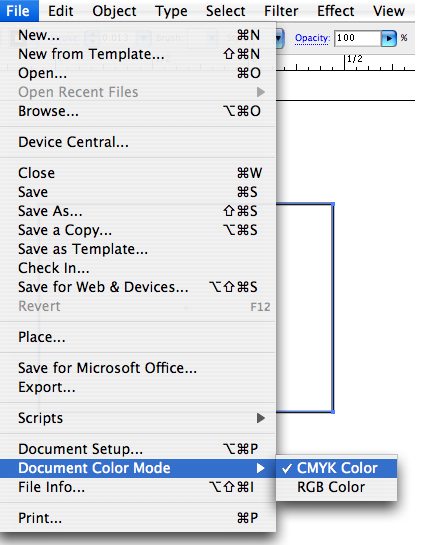
Step 3 – Color Mode
- Start your layout using a document in CMYK color space. Go to File -> Document Color Mode -> CMYK Color to convert document color space.
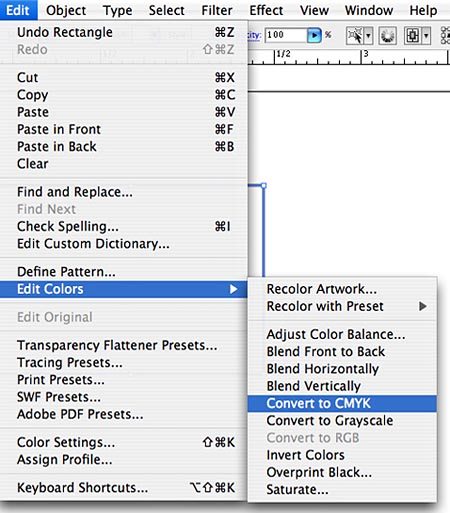
- To convert any linked/embedded images or other graphic elements in document to CMYK go to Edit -> Edit Colors -> Convert to CMYK.
- All images should be converted to CMYK, Color Managed and edited in an image editing program like Photoshop before brought into your layouts. See Photoshop Instructions on our website for more details.
Additional Color Options:
- Send us a Color Sample that resembles your color expectations and we will do a color review/comparison.
- You can order a Color Proof $55 (adds one day)
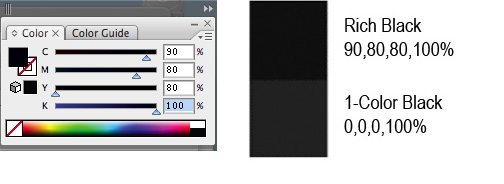
Step 4 – “Rich” Black Values
In order for color side black borders, headlines, and text to appear dark and saturated (“rich”), you will need to set your CMYK (Cyan, Magenta, Yellow, and Black) values accordingly:
C = 90%
M = 80%
Y = 80%
K = 100%
Caution: Black values that appear the same onscreen may actually be vastly different when printed:
Step 5 – Image Quality & Resolution
Good image quality and color makes a big difference when your order is printed.
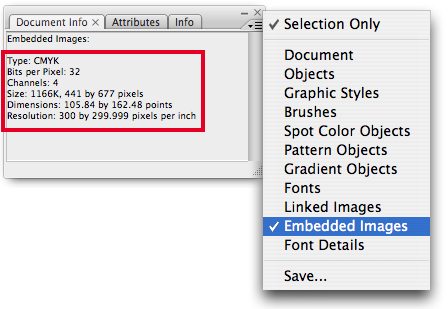
- Go to -> Window -> Document Info -> Fly out menu (upper right corner) -> Embedded (or linked) Image and check for image resolution.
- We recommend 355 PPI for all images and 1200 PPI for all bitmap images.

To prevent poor quality images your file(s) should meet some basic standards of quality and color:
-
-
- Resolution:
355 PPI (pixels per inch)
1,200 PPI for bitmap (B/W) TIFFs - Image Quality:
JPEG Compression
Digital Cameras - Frontside Color: CMYK
Also see our Monitor Calibration and Printing Profiles - Backside Color: CMYK (4/4), Grayscale or B/W (4/1)
- Resolution:
-
Additional Color Options:
-
- Send us a Color Sample that resembles your color expectations and we will do a color review/comparison.
- You can order a Color Proof $55 (adds one day)
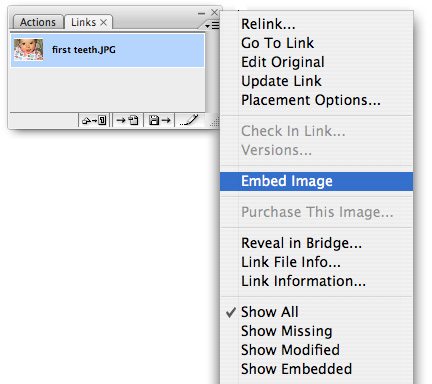
Step 6 – Embed All Images
It is essential that all images be embedded in your Illustrator document. Select the image you want to embed, go to the Links palette, select the fly-out menu and pull down to “Embed Image.”
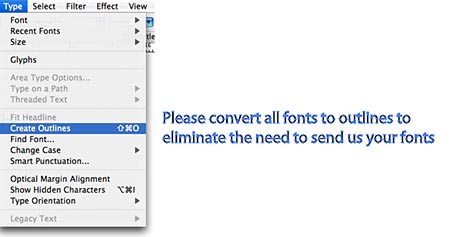
Step 7 – Fonts to Outlines
- Please convert all your type to outlines (vector objects) before submitting your order. This will eliminate the need to send us your fonts.
- Select All and go to Type -> Create Outlines.
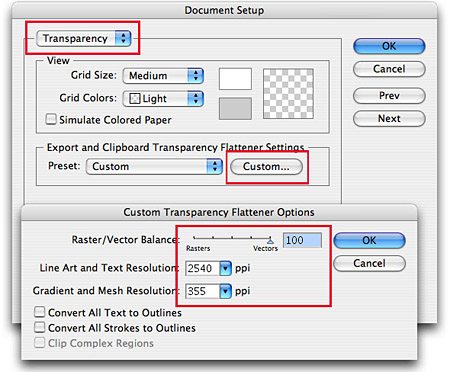
Step 8 – Output Resolution & Transparency Settings
- Go to File -> Document Setup -> Transparency -> Custom
- Be sure that the transparency slider is set all the way to the right (100), Line Art is at 2540 ppi, and Gradient Resolution at 355 ppi
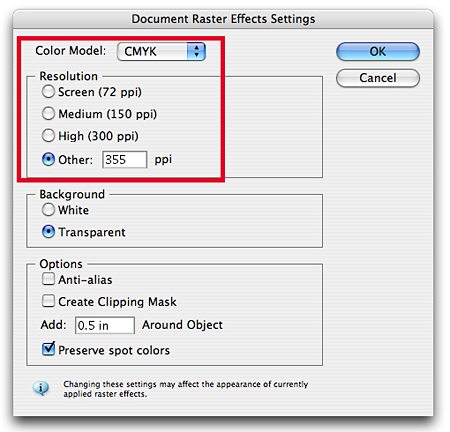
Step 9 – Document Raster Effects Settings
- Go to Effect -> Document Raster Effects Settings
- Be sure that the Color Model is set to CMYK, Resolution is set to 355 PPI, Background is set to Transparent, and “Anti-Alias” should be enabled.
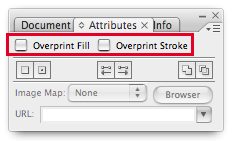
Step 10 – Overprinting
Go to Window -> Attributes and uncheck both Overprint Fill and Overprint Stroke.
Caution: Leaving Overprint on may cause elements in your layout to print incorrectly or drop out completely.
Step 11 – Thin Hairlines
Hairlines thinner than .25 points may not show up when printed.
To check a line thickness select the keyline or stroke and go to Window / Stroke (F10).
Caution: Be sure to set the line width to .25 points or higher. Strokes any thinner than .25 may not print visible.

Step 12 – U.S. Postal Regulations
If you plan on mailing your postcards (or having us mail them for you), your layout must meet U.S. Postal Regulations.
